
How to Remove Background from Image on Slides: The Ultimate Guide for Professional Presentations
Master the art of removing backgrounds from images in Google Slides and PowerPoint. Learn professional techniques, compare tools, and discover how AI simplifies the process.
Creating a professional presentation is often a battle against visual clutter. You find the perfect product shot or icon, but it comes with a distracting gray or mismatched background that breaks the flow of your slide deck. Whether you are building a pitch deck for investors or a product catalog for your Shopify store, knowing how to remove the background from an image on slides is a non-negotiable skill.
In this comprehensive guide, we will explore every method available—from the built-in tools in Google Slides and PowerPoint to advanced AI-driven solutions like SellerCam that provide studio-quality results in seconds.

Why Background Removal Matters for Presentations
When you overlay an image with a solid white box onto a colored or textured slide, it creates a "sticker effect." This looks amateurish and draws the eye away from your message. Removing the background allows your subject to integrate seamlessly with your brand's color palette.
For e-commerce sellers, this is even more critical. If you are presenting a new collection to a distributor, your product needs to look "heroic." A transparent background allows you to layer products, add soft shadows, and create a sense of depth that a standard photo simply cannot achieve.
The Impact of Visual Consistency
Consistency is the hallmark of professional design. When every image on your slides follows the same transparency rules, the viewer focuses on the content rather than the formatting errors.
| Feature | Solid Background Images | Transparent PNG Images |
|---|---|---|
| Visual Flow | Interrupted by borders | Seamless integration |
| Layering | Impossible (blocks layers) | High flexibility |
| Brand Alignment | Limited to image background | Adapts to slide theme |
| Professionalism | Low/Amateur | High/Agency-level |
Method 1: Using Built-in Tools in Google Slides
Most users start with the native tools. While Google Slides doesn't have a "magic wand" as powerful as Photoshop, it offers basic transparency adjustments that can work for simple images.
Steps for Google Slides
- Select your image on the slide.
- Click on Format options in the top toolbar.
- Open the Adjustments tab.
- Use the Opacity slider.
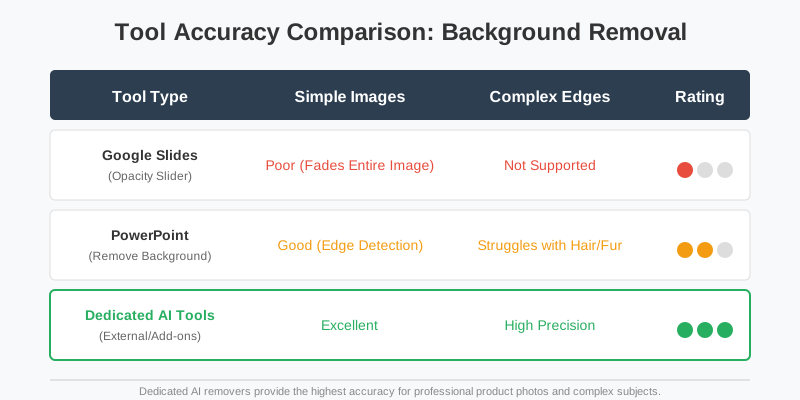
The Limitation: This method makes the entire image transparent, not just the background. It is rarely the right choice for professional product photos. For true background removal within the Google ecosystem, you often need to use a third-party add-on or an external tool before importing the file.
Method 2: The PowerPoint "Remove Background" Feature
Microsoft PowerPoint is significantly more advanced than Google Slides in this department. It features a dedicated "Remove Background" tool that uses edge detection to isolate the subject.
How to use it:
- Double-click the image to open the Picture Format tab.
- Click Remove Background.
- PowerPoint will highlight the area to be removed in purple.
- Use "Mark Areas to Keep" or "Mark Areas to Remove" to fine-tune the edges.
- Click Keep Changes.
While better than Google Slides, PowerPoint often struggles with complex edges like hair, fur, or semi-transparent materials (like glassware).
Method 3: The Professional Standard—AI Background Removal
If you are a serious seller or a high-stakes presenter, "good enough" isn't enough. This is where AI-specialized tools like SellerCam change the game. Instead of manually clicking edges or settling for blurry borders, AI analyzes the pixels to distinguish between the subject and the environment.
Why External AI Tools Win
- Sub-pixel Accuracy: They handle fine details like product textures and complex silhouettes.
- Speed: Processing takes less than 3 seconds.
- Batch Processing: You can clean up 50 product images at once rather than one by one in a slide editor.
Comparison of Workflow Efficiency
| Task | Manual (PowerPoint/Slides) | AI-Driven (SellerCam) |
|---|---|---|
| Selection Time | 2-5 minutes per image | 2 seconds per image |
| Edge Quality | Jagged/Pixelated | Smooth/Anti-aliased |
| Complex Shapes | Very difficult | Automatic |
| Software Required | Desktop App | Browser-based |
Step-by-Step Workflow for Slides using SellerCam
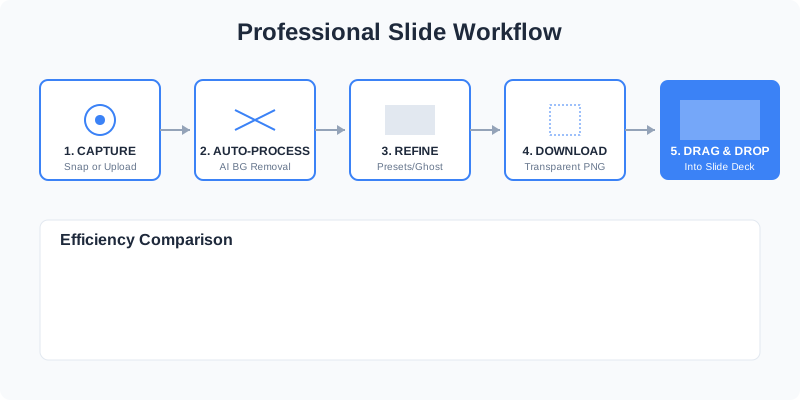
To get the best results for your presentation, follow this professional workflow:
- Capture or Upload: Use the SellerCam web-based camera to snap a photo of your product or upload an existing file from your drive.
- Auto-Process: The AI automatically detects the subject and strips away the background.
- Refine (Optional): If you need a specific "Ghost Mannequin" effect for apparel or a specific white background for Amazon-style slides, select the preset.
- Download as PNG: Ensure you save the file as a PNG to preserve the transparency.
- Drag and Drop: Move the file directly into Google Slides or PowerPoint.
Deep Dive: Real-World Use Cases for Background-Free Slides
To truly understand the power of background removal, let's look at how different industries apply these techniques to elevate their presentations.
1. The Investor Pitch Deck
In a high-stakes pitch, your product is the star. If you are showing a physical prototype—say, a new smart home device—placing it on a clean, gradient background makes it look like a finished consumer product rather than a lab experiment. By removing the background, you can place the device next to icons representing its features (Wi-Fi, Security, Cloud) without the visual noise of a tabletop or a messy office background.
2. E-commerce Quarterly Reviews
For Shopify or Amazon sellers, quarterly reviews often involve showing "Best Sellers" vs. "New Arrivals." Using transparent backgrounds allows you to create a "collage" effect where products overlap slightly. This creates a dynamic, magazine-style layout that is far more engaging than a series of isolated boxes.
3. Educational and Training Slides
If you are creating a tutorial on how to use a specific tool, removing the background from the tool itself allows you to place it directly over screenshots of the software or instructional text. This "contextual placement" helps students focus on the specific object being discussed.
Advanced Techniques for "Slide-Ready" Images
Removing the background is only the first step. To make your images truly pop on a slide, consider these design principles:
1. The Power of Drop Shadows
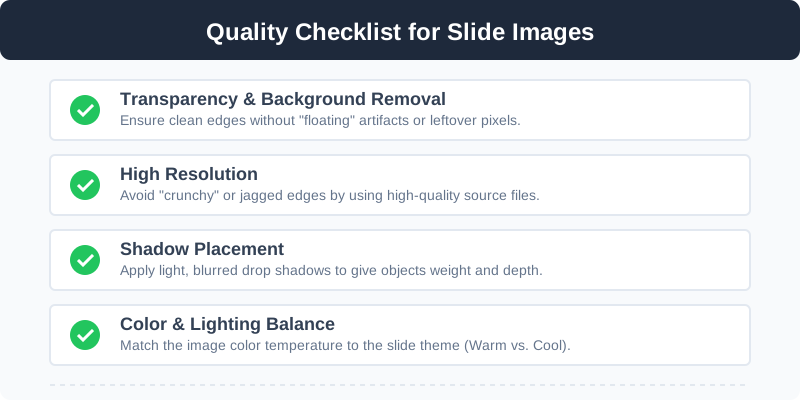
Once the background is gone, your image might look like it's "floating" unnaturally. In Google Slides, go to Format options > Drop shadow. A light, blurred shadow gives the object weight and makes it look like it’s sitting on the slide surface.
Pro Tip: Match the shadow direction to the "light source" of your slide theme. If your header has a shadow falling to the bottom-right, your product image should too.
2. High Resolution is Key
Background removal involves "cutting" pixels. If your original image is low resolution, the edges will look "crunchy" or jagged. Always start with the highest resolution possible. SellerCam's enhancement features can help upscale images if your original source is sub-par.
3. Mind the Lighting and Color Grading
If your slide has a dark theme, an image shot in bright, "cool" light might look out of place. After removing the background, use the "Adjustments" panel in your slide software to tweak the brightness and contrast. This helps the subject "sit" better in its new digital environment.
Comprehensive FAQ: Background Removal for Slides
Q: Does Google Slides support transparent PNGs? A: Yes, Google Slides fully supports PNG and WebP files with transparency. Simply drag and drop the file onto your slide.
Q: Why does my image have a black background after I remove it? A: This usually happens if you save the file as a JPEG. JPEGs do not support transparency and will often fill the transparent areas with black or white. Always export as a PNG.
Q: Can I remove the background from a video in slides? A: Currently, native slide tools do not support video background removal. You would need to use a tool like Unscreen or Adobe Premiere before importing the video into your deck.
Q: How do I handle shadows that were in the original photo? A: Most AI tools like SellerCam will remove the original "messy" shadow. It is almost always better to remove the original shadow and add a clean, digital drop shadow using the slide software's format options.
Q: Is there a limit to how many images I can process? A: While PowerPoint and Google Slides process images one by one, professional AI tools allow for batch processing, which is essential if you are building a catalog of 50+ slides.
Checklist for Perfect Slide Images
Before you finalize your presentation, run through this quality checklist to ensure your images meet professional standards.
| Checkpoint | Requirement | Why it matters |
|---|---|---|
| Edge Smoothness | No "white halos" around the subject | Prevents the amateur "cut-out" look |
| File Format | Must be .PNG or .WebP (with alpha) | JPEGs do not support transparency |
| File Size | Under 2MB per image | Keeps the presentation from lagging |
| Alignment | Subject centered or rule of thirds | Improves visual hierarchy |
| Color Balance | Matches the slide theme temperature | Ensures the image looks "native" to the deck |
Common Mistakes to Avoid
Even with the best tools, certain pitfalls can ruin your slide aesthetics:
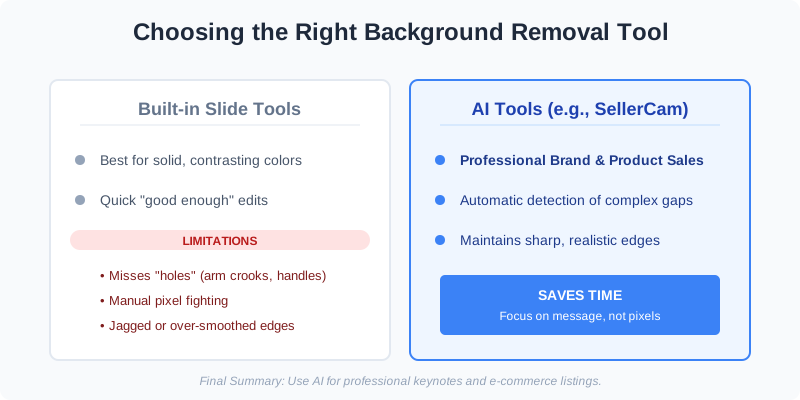
- Forgetting the "Holes": When removing backgrounds manually, people often forget the small gaps (like the space between a bag handle or the crook of an arm). AI tools usually catch these automatically.
- Over-Smoothing: If you use a tool that blurs the edges too much to hide a bad cut, the product looks out of focus and "dreamy" in a way that feels unintentional.
- Ignoring Platform Requirements: If you are using these slides for an Amazon Brand Story or a Shopify lookbook, remember that those platforms have their own specific aspect ratio requirements.
- Distorting Proportions: When resizing your background-free image, always hold the "Shift" key to maintain the aspect ratio. A "squashed" product photo is an instant credibility killer.
The Future of Slide Design: Generative AI
We are entering an era where background removal is just the beginning. New AI tools allow you to not only remove the background but replace it with a "generative" scene. For example, you could take a photo of a coffee mug on your kitchen table, remove the background, and then use AI to place it on a marble countertop in a sunlit cafe—all within seconds.
For presenters, this means you can customize the "environment" of your products to match the specific audience you are speaking to. Presenting to a tech firm? Use a minimalist, high-tech background. Presenting to a lifestyle brand? Use a warm, organic background.
Summary: Choosing the Right Tool for the Job
If you are in a rush and the background is a solid, contrasting color, the built-in "Remove Background" tool in PowerPoint will suffice. However, for anyone building a brand, selling a product, or delivering a keynote, the limitations of built-in slide tools are too great.
Using a dedicated AI tool like SellerCam ensures that your images are not just "transparent," but professional. By automating the tedious parts of photo editing, you can spend more time on your message and less time fighting with pixels.
Ready to transform your presentation visuals? Don't settle for jagged edges and messy backgrounds. Try SellerCam’s AI-powered background removal today and see the difference studio-quality images make on your slides.
Ready to upgrade your product photos? Try SellerCam's AI camera →
Author

Categories
More Posts

The Ultimate Guide to Invisible Ghost Mannequin Photography for E-commerce
Master the ghost mannequin effect to create professional, 3D hollow man clothing images that boost sales and reduce returns for your fashion brand.

The Ultimate Guide to Removing Backgrounds from Logo Images for eCommerce
Learn how to remove background from logo images effectively. We cover AI tools, manual methods, and platform-specific requirements for transparent logos.

How to Remove Background from an Image in Google Slides: The Ultimate Guide
Master the art of background removal in Google Slides with our step-by-step guide. Learn about built-in tools, Gemini AI, and professional alternatives for high-quality results.
Newsletter
Join the community
Subscribe to our newsletter for the latest news and updates