
Mastering Background Removal in Adobe Illustrator: A Comprehensive Guide for E-commerce Sellers
Learn five professional methods to remove backgrounds in Adobe Illustrator, from Image Trace to Clipping Masks, and discover faster AI alternatives for product photography.
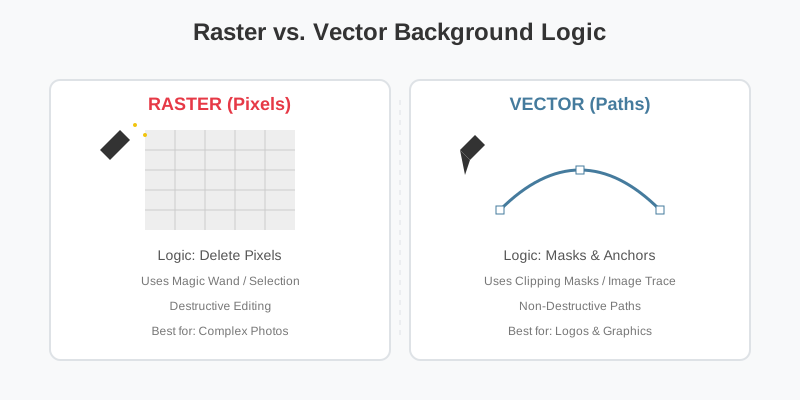
If you have ever tried to remove a background in Adobe Illustrator, you have likely encountered a frustrating reality: unlike Photoshop, Illustrator is a vector-based tool, not a raster editor. This means there is no "Magic Wand" or "Quick Selection" tool that deletes pixels with a single click. Instead, you are dealing with paths, anchors, and masks.
For e-commerce sellers, this distinction is critical. Whether you are prepping a logo for a Shopify header or trying to clean up a product shot for Amazon, understanding how Illustrator handles transparency is the difference between a professional-looking listing and a jagged, amateurish mess. In this guide, we will dive deep into every technical method available, explore the pros and cons of each, and help you decide which workflow fits your business needs.
Why Use Illustrator for Background Removal?
You might wonder why anyone would use Illustrator instead of Photoshop. The answer usually comes down to workflow integration. If you are already designing a flyer, a packaging label, or a multi-page catalog within Illustrator, jumping back and forth between apps is a massive time sink.
Furthermore, Illustrator’s Image Trace feature allows you to convert low-resolution raster images into scalable vectors, which is a lifesaver for logos. However, for complex product photography—like a model wearing a lace dress or a glass bottle with reflections—Illustrator can be a nightmare.
The Raster vs. Vector Dilemma
Before we start, it's important to understand that Illustrator doesn't "delete" the background in the same way a photo editor does. It either masks it (hides it) or converts it into shapes. This means the file size of your Illustrator document might remain large because the original image data is still tucked away inside the mask.
| Feature | Adobe Illustrator | Adobe Photoshop | SellerCam AI |
|---|---|---|---|
| Primary Tool | Clipping Masks | Layer Masks | Deep Learning AI |
| Edge Quality | Sharp/Mathematical | Soft/Feathered | Natural/Anti-aliased |
| Learning Curve | Steep | Moderate | None |
| Best For | Logos & Icons | High-end Retouching | E-commerce Products |
Method 1: The Clipping Mask (The Professional Standard)
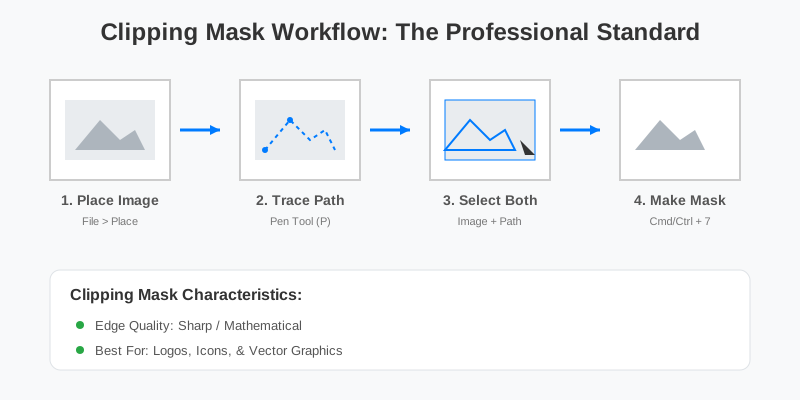
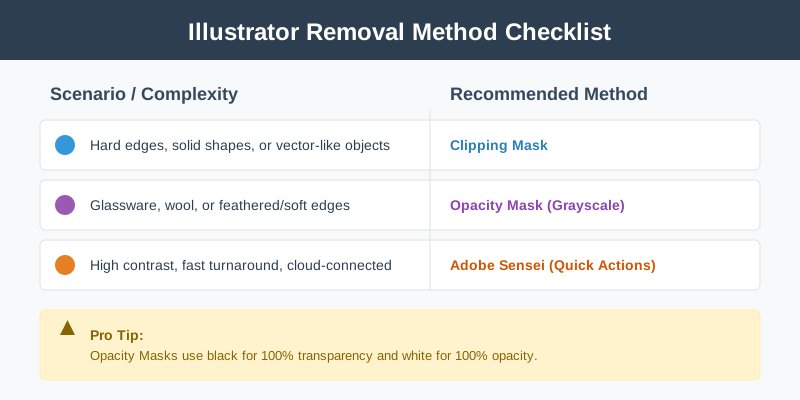
The most common way to "remove" a background in Illustrator is actually to hide it. A Clipping Mask acts like a window; you draw a shape (the window), and only what is inside that shape remains visible. This is a non-destructive method, meaning you can always adjust the edges later.
Detailed Step-by-Step for Clipping Masks
- Place your image: Go to
File > Placeand click your canvas. Ensure the "Link" box is unchecked if you want the image embedded. - Select the Pen Tool (P): This is where the manual labor begins. Set your Fill to "None" and your Stroke to a bright color (like neon green) so you can see your path clearly against the product.
- Meticulous Tracing: Click to create anchor points. For curves, click and drag to create Bezier handles. For sharp corners, Option/Alt-click the anchor point.
- Close the Path: You must return to the very first anchor point. A small circle will appear next to your cursor, indicating the path is closing.
- Final Selection: Use the Selection Tool (V). Click your path, then hold Shift and click the image.
- Execute Mask: Right-click and select
Make Clipping Maskor pressCmd/Ctrl + 7.
Pro Tip: If you realize you missed a spot, use the Direct Selection Tool (A) to click individual anchor points and nudge them into place.
Method 2: Image Trace (Best for Logos and Simple Graphics)
If you are working with a simple graphic on a white background, Image Trace can automate the process by converting the entire image into vector shapes. This is ideal for turning a hand-drawn sketch or a low-res JPG logo into a crisp, transparent SVG.
- Select the Image: Click on your placed photo.
- Open Image Trace Panel: Go to
Window > Image Trace. - Preset Selection: Choose "High Fidelity Photo" for complex images or "Silhouettes" for simple shapes.
- Select "Ignore White": Under the "Advanced" toggle, check the box that says "Ignore White." This tells Illustrator to treat white pixels as empty space.
- Expand: Click the "Expand" button in the top toolbar. This is the crucial step that turns the trace into editable vector paths.
While this works wonders for black-and-white logos, it often destroys the detail in actual product photos, turning a crisp sneaker into a muddy "painted" illustration. It is not recommended for high-end e-commerce listings where texture matters.
Method 3: Using the Eraser Tool (The "Quick but Dirty" Way)
Many beginners gravitate toward the Eraser Tool (Shift + E). While it feels intuitive—like using a physical eraser—it is generally discouraged for professional work because it is destructive.
When to use the Eraser Tool:
- For rough mockups where precision isn't required.
- When you need to quickly "cut" a vector shape into two pieces.
- When working with simple shapes that don't require clean, mathematical curves.
| Pros of Eraser Tool | Cons of Eraser Tool |
|---|---|
| Intuitive "brush" feel | Extremely difficult to get straight edges |
| Good for rough mockups | Destructive editing (cannot undo easily) |
| No complex paths needed | Creates "jagged" pixelated borders |
Method 4: Opacity Masks (For Soft Edges and Transparency)
If your product has transparent elements (like glassware) or soft edges (like a wool sweater or hair), a Clipping Mask will look too harsh. An Opacity Mask allows for gradients of transparency, mimicking the "Layer Mask" functionality of Photoshop.
- Draw a shape over your image that covers the area you want to keep.
- Fill the shape with a Gradient: Open the Gradient panel. Use a black-to-white linear or radial gradient. In Opacity Masks, Black = 100% transparent, and White = 100% opaque.
- Open Transparency Panel: Go to
Window > Transparency. Select both the image and the gradient shape. - Make Mask: Click "Make Mask" in the Transparency panel.
- Refine: You can click the mask thumbnail in the Transparency panel to edit the gradient directly, allowing you to "fade" the edges of your product into the background.
This method is advanced and gives you "feathered" edges, but it requires a deep understanding of grayscale values to get right.
Method 5: Adobe Sensei (The "New" AI Way)
In recent versions of Illustrator (2023 and later), Adobe has integrated "Adobe Sensei" (their AI) into the Properties Panel. If you select an image, you may see a "Quick Actions" section with a "Remove Background" button.
How it works: Adobe recently added this as a cloud-based service. It sends your image to their servers, processes it using Photoshop's background removal engine, and returns a masked result.
The Catch:
- It requires a stable internet connection.
- It often struggles with low-contrast images (e.g., a white product on a light gray background).
- It creates a mask that can be difficult to edit if the AI makes a mistake around complex edges like jewelry or mesh.
The Hidden Struggle: Why Manual Removal Fails E-commerce
Reddit users frequently vent their frustration regarding Illustrator's lack of a robust, built-in "Remove Background" button. As one user noted on r/AdobeIllustrator, "It's 2024, and we still have to manually trace objects in a $20/month software?"
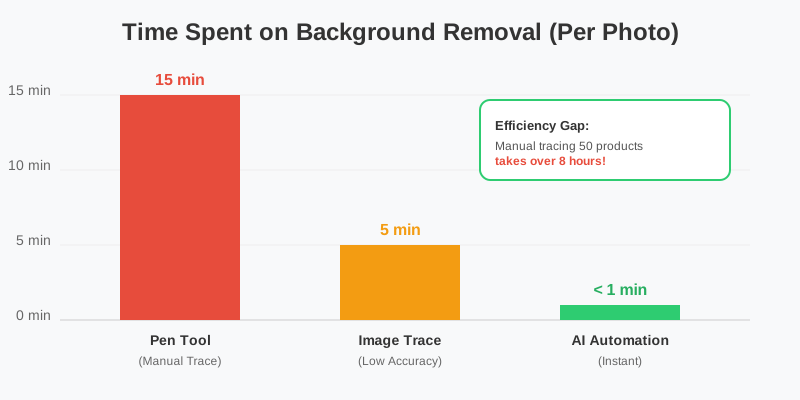
The reality is that Illustrator isn't designed for pixel manipulation. For e-commerce sellers, the "manual trace" method takes approximately 10–15 minutes per photo. If you have a catalog of 50 products, that is over 8 hours of tedious clicking. This is time that could be spent on marketing, sourcing, or customer service.
A Better Alternative: SellerCam AI
For e-commerce photography, you don't actually need the vector capabilities of Illustrator; you need a clean, high-resolution PNG with transparency. This is where SellerCam bridges the gap. Instead of spending 15 minutes drawing anchor points around a shoe, you can achieve a studio-quality white background in seconds.
Why Sellers are Switching to AI-First Workflows:
- Speed: Process 100 images in the time it takes to trace one in Illustrator.
- Shadow Preservation: AI can detect and preserve natural contact shadows, which makes products look "grounded" rather than floating in space.
- Consistency: Ensure every product in your catalog has the exact same padding and alignment automatically.
By using SellerCam's AI-powered camera, the background is handled at the moment of capture or via instant upload. The AI understands the difference between the product and the environment, preserving fine details like shadows and textures that Illustrator's Clipping Masks often clip away.
Common FAQ: Background Removal in Illustrator
Q: Can I remove a background from a PNG in Illustrator?
Yes, but the process is the same as a JPG. You must use a Clipping Mask or the "Remove Background" quick action. Illustrator treats all raster files (PNG, JPG, TIFF) the same way.
Q: Why is my background still white after I export?
When exporting, you must go to File > Export > Export As... and select PNG. In the following dialog box, ensure the "Background Color" is set to Transparent. If it's set to White, Illustrator will fill the empty space with white pixels.
Q: How do I remove the background from multiple images at once?
Illustrator does not have a native "batch" background removal tool for raster images. You would need to create an "Action" (Window > Actions), but this only works if every image has the object in the exact same spot. For batch processing, AI tools like SellerCam are significantly more effective.
Q: My Pen Tool lines are jagged. How do I fix them?
Use the Smooth Tool (found under the Pencil tool group). Run it over your path to reduce the number of anchor points and create more natural curves.
Pro Tips for Clean Results in Illustrator
If you must stay within Illustrator, follow these guidelines to ensure your e-commerce photos meet platform standards:
- Zoom to 600%: When using the Pen Tool, zoom in close. If you trace at 100%, you will miss the "halo" of the background.
- Place Anchors Inside: Always draw your path 1-2 pixels inside the product edge. This prevents a thin sliver of the old background from showing up.
- Handle Shadows Separately: Don't try to include the original shadow in your mask. It will look messy. It is better to remove the background entirely and add a "Drop Shadow" effect later via
Effect > Stylize > Drop Shadow. - Use Layers: Keep your original image on a locked bottom layer and draw your paths on a new layer above it. This prevents you from accidentally moving the image while tracing.
| Platform | Background Requirement | Best Illustrator Method |
|---|---|---|
| Amazon | Pure White (255,255,255) | Clipping Mask + White Rect |
| Shopify | Transparent PNG | Clipping Mask + Export Assets |
| Lifestyle/Contextual | Opacity Mask for blending | |
| Etsy | Clean/Minimalist | Image Trace (for handmade logos) |
Summary: Choosing Your Workflow
Adobe Illustrator is a powerhouse for design, but it is a hammer being used to turn a screw when it comes to background removal. It is a tool built for precision and scalability, not for the rapid-fire needs of a modern e-commerce business.
- Use Illustrator when: You are creating a logo, a vector illustration, or a complex print layout where the product is just one small part of the design.
- Use Photoshop when: You need high-end retouching, color correction, or "healing" of physical defects on the product.
- Use SellerCam when: You need to get 20+ products listed on Amazon or Shopify today and want them to look like they were shot in a professional studio.

Ready to stop tracing and start selling? Don't let tedious editing slow down your product launches. Your time is valuable—spend it on strategy, not anchor points. Try SellerCam's AI camera today and get perfect, background-free product photos in one click.
Author

Categories
More Posts

Best Photo Editing Software for eBay Sellers: From Professional Suites to AI Automations
Discover the best photo editing software for eBay. Compare professional tools, free editors, and AI-powered solutions to boost your sales and meet eBay's image requirements.

How to Remove Background from Image in Google Slides: The Ultimate Professional Guide
Master background removal in Google Slides using built-in AI tools, third-party add-ons, and professional AI cameras to create stunning presentations.

The Ultimate Guide to Clothing Photography: Mastering the Ghost Mannequin Effect
Learn how to achieve the professional ghost mannequin effect for your clothing brand. A deep dive into photography techniques, post-processing, and AI tools.
Newsletter
Join the community
Subscribe to our newsletter for the latest news and updates