The Ultimate Guide to Ghost Mannequin Photography Studio Setup and Success
Master the art of ghost mannequin photography. Learn studio setup, lighting techniques, and how AI is revolutionizing the invisible mannequin effect for ecommerce.
If you’ve spent any time browsing high-end fashion retailers like Nordstrom, ASOS, or Lululemon, you’ve seen the "ghost mannequin" effect. The clothes look perfectly filled out, as if an invisible person is wearing them, yet there are no distracting necklines or plastic limbs in sight.
For ecommerce sellers, this isn't just a stylistic choice; it’s a conversion necessity. Research consistently shows that customers prefer seeing how a garment hangs on a body rather than seeing it flat-lay, but they find human models or standard mannequins distracting. The ghost mannequin (or "invisible mannequin") technique provides the 3D volume of a model with the clean, distraction-free aesthetic of a studio shot.
Setting up a professional ghost mannequin photography studio requires a blend of specific hardware, precise lighting, and sophisticated post-processing. In this guide, we’ll break down every element of the studio workflow, from the physical mannequin to the AI-powered editing tools that are making this process faster than ever.
Why Ghost Mannequin Photography Matters
Before we dive into the "how," let's look at the "why." Why invest in a specialized studio setup instead of just using flat-lay or live models?
The primary reason is perceived value. In the world of online fashion, the image is the product. A flat-lay t-shirt looks like a $10 item; a ghost mannequin t-shirt looks like a $40 item. It communicates fit, fabric weight, and tailoring in a way that flat photography cannot.
Psychology of the Invisible Mannequin
When a customer looks at a product photo, they are mentally "trying it on." A flat-lay image requires the brain to do the heavy lifting of imagining how that fabric will drape over shoulders or curve around a waist. A live model provides that context, but it also introduces "model bias"—if the customer doesn't identify with the model's look, hair, or ethnicity, they may subconsciously feel the product isn't for them.
The ghost mannequin removes these psychological barriers. It provides the structural integrity of a human body without the personal identity of a model. This "blank canvas" approach allows the customer to project themselves into the garment more effectively.
| Feature | Flat Lay | Live Model | Ghost Mannequin |
|---|---|---|---|
| 3D Shape | No | Yes | Yes |
| Cost per Image | Low | Very High | Moderate |
| Consistency | High | Low | High |
| Customer Focus | Product only | Lifestyle/Model | Product only |
| Speed | Fast | Slow | Moderate |
The Essential Studio Equipment List
Building a ghost mannequin photography studio isn't just about buying a camera. You need a specialized environment designed for consistency and post-production efficiency.
1. The Modular Mannequin
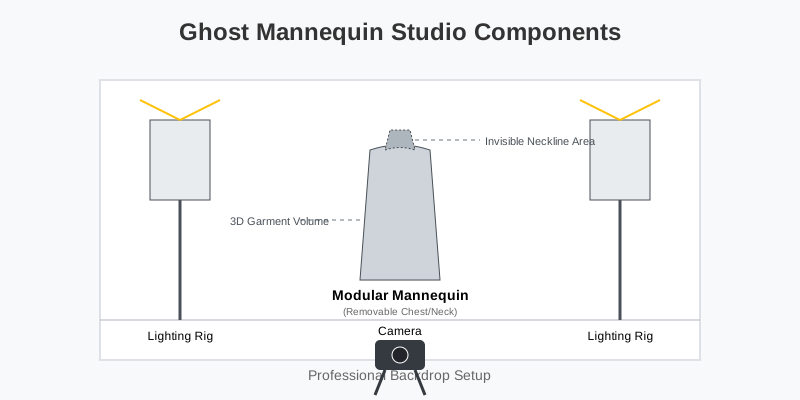
Standard mannequins won't work. You need a "ghost" or "invisible" mannequin that features removable chest and neck pieces. These mannequins are usually matte white or light grey to minimize reflections. They come with magnetic or clip-on sections that can be removed depending on the garment. For example, when shooting a V-neck sweater, you remove the neck and upper chest pieces so the camera can see the inside back of the collar.
2. Lighting Configuration: The Four-Point System
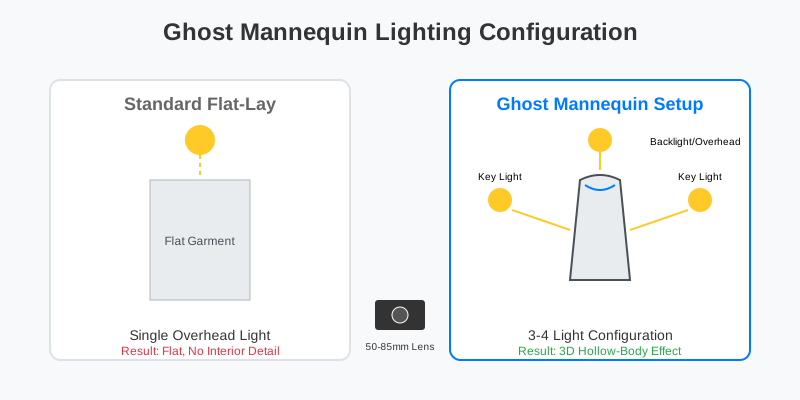
You need a minimum of three lights, though four is ideal to eliminate unwanted shadows that can make the "ghost" effect look muddy.
- Two Key Lights: Positioned at 45-degree angles to the front of the mannequin. Use large softboxes to ensure the light wraps around the garment's curves.
- One Backlight: Positioned behind the mannequin, facing the backdrop. This "blows out" the background to a pure white, making it much easier for AI or manual editors to mask the product later.
- One Overhead Light (Hair Light): Positioned above the mannequin to highlight textures on the shoulders and prevent the neck area from falling into deep shadow.
3. The Camera and Lens Selection
A DSLR or Mirrorless camera with at least 24MP is standard. However, the lens is more important than the body.
- Avoid Wide Angles: Lenses wider than 35mm create "barrel distortion," making the mannequin look wider in the middle than it actually is.
- The Sweet Spot: A 50mm to 85mm prime lens is preferred. These focal lengths provide a natural perspective that mimics how the human eye sees the garment from a distance.
- Settings: Shoot at an aperture of f/8 to f/11. This ensures the entire garment, from the front buttons to the back collar, stays in sharp focus.
The Step-by-Step Studio Workflow
Achieving the perfect invisible mannequin effect is a two-part process: the shoot and the composite. Precision in the first phase saves hours in the second.
Phase 1: The Shoot (The "Hero" and the "Inlay")
First, you dress the mannequin. It’s vital to use clips and pins on the back (the side not being photographed) to ensure the garment fits perfectly. If the shirt is too baggy, it will look sloppy in the final image.
- The Hero Shot: This is the front view. Ensure the sleeves are symmetrical and the hem is level.
- The Inlay Shot: This is the "secret sauce." You remove the chest/neck piece of the mannequin. If the garment is a jacket, you might even open it slightly. You then take a photo of the inside back of the garment (the brand tag area). This piece will be "tucked" behind the front shot during editing to create the illusion of a hollow body.
Phase 2: The Composite
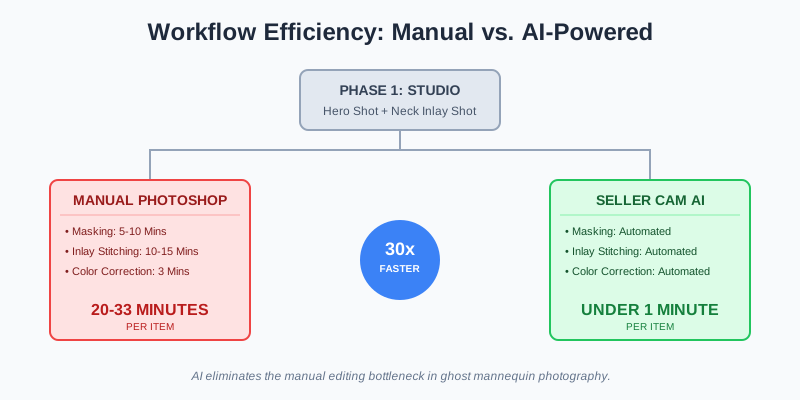
In traditional studios, this is where a Photoshop expert spends 20-30 minutes per image. They mask out the mannequin, align the neck inlay, and create artificial shadows to give the garment depth.
Advanced Techniques for Different Apparel Types
Not all clothing is created equal. Your studio setup needs to adapt based on what you are shooting.
1. Trousers and Jeans
For bottoms, you use "ghost legs." The challenge here is the crotch and waist area. Use fishing line to hang the waistband if the mannequin doesn't have a torso, ensuring the "hollow" look extends into the waist.
2. Hoodies and Outerwear
Hoodies are the most difficult ghost mannequin subjects. You often need to stuff the hood with tissue paper or use thin wire to give it shape, then remove the stuffing in post-production. The "inlay" shot for a hoodie must include the interior of the hood to look realistic.
3. Dresses and Skirts
For long dresses, the mannequin should be mounted on a tall stand. Use a fan on a very low setting if you want to create a sense of movement or "flow" in the fabric, though for standard ecommerce, a static, symmetrical look is preferred.
Manual vs. AI-Powered Post-Processing
The biggest bottleneck in ghost mannequin photography has always been the editing. However, AI is rapidly changing the ROI for small to medium-sized studios.
The Manual Nightmare
In a manual workflow, an editor must:
- Create a clipping path for the main garment.
- Create a clipping path for the neck inlay.
- Warp the neck inlay to match the perspective of the front shot.
- Add "drop shadows" and "inner shadows" to simulate depth.
- Color match both shots to ensure the lighting looks consistent.
The AI Revolution
AI tools like SellerCam use neural networks trained on millions of fashion images. They recognize where a "neckline" ends and where an "inlay" should begin.
| Task | Manual Photoshop Time | SellerCam AI Time |
|---|---|---|
| Background Removal | 2-5 Minutes | 2 Seconds |
| Mannequin Masking | 5-10 Minutes | Automated |
| Neck Inlay Stitching | 10-15 Minutes | Automated |
| Color Correction | 3 Minutes | Automated |
| Total per Item | 20-33 Minutes | Under 1 Minute |
Pro Tips for Studio Success
If you are setting up your own space, keep these professional tips in mind to ensure high-quality output:
- Use a Steamer: Wrinkles are the enemy of high-end photography. Even the best AI can't perfectly fix a poorly prepped garment without losing texture detail. Steam every item 5 minutes before it goes on the mannequin.
- Consistent Camera Height: Set your tripod at chest height for tops and hip height for bottoms. Changing the perspective between shots makes batch editing impossible. Mark the floor with tape so the tripod always returns to the same spot.
- The "C" Curve: When photographing the neck inlay, ensure the garment is draped in a slight "C" shape. This mimics the natural curve of the neck and makes the final composite look realistic rather than flat.
- Symmetry is King: Use a grid overlay on your camera's viewfinder. Ensure the shoulders are perfectly level. If one shoulder is 1cm higher than the other, the garment will look "off" to the customer, even if they can't pinpoint why.
- Tethered Shooting: Connect your camera to a laptop (using software like Capture One or Lightroom). Seeing the images on a large screen immediately allows you to spot stray threads or dust that you would miss on the tiny camera LCD.
Common Challenges and Solutions
Even with the best equipment, you will run into hurdles. The most common is "color bleed," where the color of the mannequin reflects onto the inside of the garment.
| Problem | Cause | Solution |
|---|---|---|
| Color Bleed | Mannequin color reflecting on fabric | Use a matte grey or white mannequin; move lights further away. |
| Loss of Texture | Over-exposure (Too much light) | Use diffusers/softboxes to soften the light. |
| Asymmetric Fit | Poor dressing technique | Use "bulldog" clips on the back to pull fabric taut and centered. |
| Ghosting Edges | Poor masking in post | Increase the contrast between the garment and the white background. |
| Flat Appearance | Lack of directional light | Move one key light slightly further back to create subtle shadows. |
Frequently Asked Questions (FAQ)
Do I really need a modular mannequin?
While you can use a standard mannequin and "patch" the neck in Photoshop, it takes three times longer. If you are shooting more than 20 items a month, a modular ghost mannequin pays for itself in saved labor hours within two months.
Can I use a smartphone for ghost mannequin photography?
Yes, provided you have professional lighting. Modern smartphones have excellent resolution, but they often apply "computational sharpening" that can make fabric look artificial. Use a manual camera app to lock your ISO and white balance.
How do I handle transparent fabrics?
Transparent or sheer fabrics are the most difficult. For these, you cannot use a ghost mannequin easily because the mannequin will show through the fabric. In these cases, it is often better to use a live model or a very high-quality flat-lay.
What is the best background color?
Pure white (Hex: #FFFFFF) is the industry standard for ecommerce. It allows the product to "pop" and integrates seamlessly with the white backgrounds of Amazon, eBay, and Shopify.
Scaling Your Production with SellerCam
For many growing brands, the cost of a full-time "Ghost Mannequin Studio" is prohibitive. Between the specialized mannequins ($500+) and the high cost of professional retouching ($5-$15 per image), the per-image cost can exceed $30.
This is where SellerCam changes the game. Our AI-powered camera and processing tools are designed specifically for ecommerce sellers who need studio-quality results without the studio-sized budget.
By using SellerCam's AI Background Removal and Enhancement tools, you can often achieve a professional "hollow man" look even with simplified setups. Our AI understands the geometry of clothing, helping to clean up edges and enhance textures that usually require hours of manual dodging and burning in Photoshop.
How SellerCam Simplifies the Process:
- Guided Shooting: Our app helps you align the "Hero" and "Inlay" shots perfectly.
- Instant Merging: The AI identifies the neck area and automatically stitches the inlay, removing the mannequin in seconds.
- Shadow Generation: We add realistic micro-shadows that give the garment a 3D feel, preventing it from looking like a flat cutout.
Conclusion: The Future of Fashion Photography
Ghost mannequin photography is no longer a luxury reserved for big-box retailers. It is a fundamental requirement for any fashion brand that wants to be taken seriously in a crowded digital marketplace. By understanding the basics of studio lighting and modular mannequins—and leveraging AI tools like SellerCam—any brand can produce world-class imagery.
The transition from traditional photography to AI-assisted workflows is the biggest shift in the industry since the move from film to digital. It allows creators to focus on the style and presentation of the clothes, while the tedious work of masking and compositing is handled by intelligent software.
Remember, the goal of your studio is to remove friction from the customer's buying journey. By providing a clear, 3D view of your products, you answer the customer's most important question: "How will this look on me?"
Ready to transform your product photos without the manual headache? Try SellerCam's AI camera today and see how we can automate your ghost mannequin workflow in seconds.
Author

Categories
More Posts

Mastering Background Removal for Product Images: The Ultimate Seller's Guide
Learn how to remove backgrounds from product images efficiently. Discover pro techniques using AI, manual tools, and platform-specific requirements to boost sales.

The Ultimate Guide to Clothing Photography: Mastering the Ghost Mannequin Effect
Learn how to achieve the professional ghost mannequin effect for your clothing brand. A deep dive into photography techniques, post-processing, and AI tools.
Mastering Background Removal in Figma: A Comprehensive Guide for Designers and Sellers
Learn how to remove backgrounds from images in Figma using AI plugins, manual masking, and external tools. Compare the best methods for speed and quality.
Newsletter
Join the community
Subscribe to our newsletter for the latest news and updates